

Best Practices

- Obviously, if not already done, always back up your project before you upgrade any of your software.
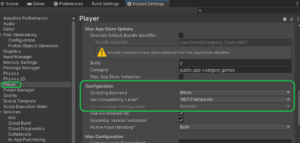
- If you are experiencing any form of Unity console error issues with MST, be sure that Unity has its API compatibility set to “.NET Framework” and backend to Mono.
- This is in the Project Settings à Player Settings Section
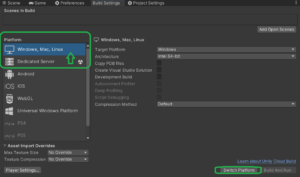
- If you are experiencing build-related issues. Always (yes always) go to build settings, and make sure you click on -Windows, Mac, Linux- and then the button ‘Switch Platform’ before each and every single build. I can not stress this fact enough.
- Best Practice. If it is already on -Windows, Mac, Linux-, click – Dedicated Server- instead, click the ‘switch platform’ button, and then AFTER it compiles (you will see it do that bottom right
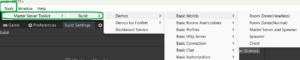
- This rule of switching platforms also applies, even when you utilize the provided for the menu that MST provides for building out demos (located in the unity editor à tools menu, MST)
- Additionally, especially if you use, windows, but really this applies to all operating systems, make sure your firewall is open to allow the built applications to communicate. Many times, users fall into an issue, and it’s simply their firewall causing that issue.
- Best Practice. If it is already on -Windows, Mac, Linux-, click – Dedicated Server- instead, click the ‘switch platform’ button, and then AFTER it compiles (you will see it do that bottom right
- At absolute worse, for the sake of testing, if you have failures in terms of working with MST regardless if it’s s demo scene inside of Unity, or built scenes outside of unity, test in a clean environment.
- This means a fresh unity instance, fresh MST import, and if you use Fishnet, Mirror, or what have you, fresh import of those.
- Make sure to check what I mentioned in number 2, to be sure the correct settings in unity are set. (Unity does not use these correct settings as default)
- All builds, normally include the following, separate and unique builds.
- Master Server and Spawner Build – This is the core of Mst, its modules, and the spawning system
- Room Build – This is the actual Game level your varied Clients (players), and interact play in
- Client Build – This is your Players’ view throughout their experience in the server.
- As it relates to how to best test scenes either provided for by MST, or ones that you are currently working on, you should have these specific scenes, to test within your editor.
- To test Client to Server specific connections. (Like logging in, varied menus before joining a room, etc.)
- Have a Client Scene made active (right click scene that is for your client)
- Add a Server Scene and then test
- To test a Rooms specific functionality and gameplay, within your editor:
- Have a Room Scene made active (right click scene that is for your client)
- Add a Server Scene and then test
- To test Client to Server specific connections. (Like logging in, varied menus before joining a room, etc.)