


Deployment Explained

In order to fully understand deployment for the server and our clients, we need to take a look at what builds means, for MST.
In MST there are typically three types of scenes.
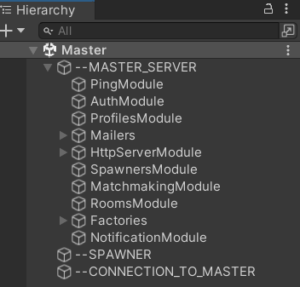
- Master Server and Spawner Scene (I.E. Our Server Logic)
- Typically contains the following game objects:
- Master Server
- Spawner
- Connection to Master
- Typically contains the following game objects:
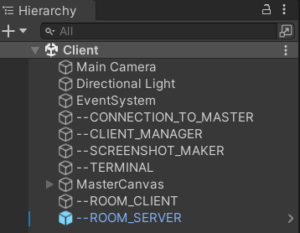
- Client Scene (I.E. our Player)
- Typically contains the following game objects:
- Main Camera
- Our player’s point of view
- Directional Light
- Event System
- Connection Master
- This connects us to the MST Server
- Client Manager
- This is for Authentication
- Screenshot Maker
- (not needed but nice to have)
- Terminal
- (not needed but nice to have)
- Master Canvas
- Think of this as the varied menus leading our players towards the game room, and their own unique player menus.
- Room Client
- Room Server
- Main Camera
- Typically contains the following game objects:
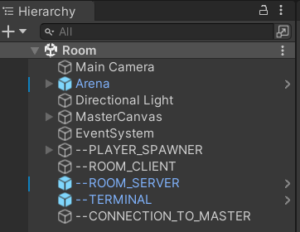
- Room Scene(s) (I.E. Our Game Levels)
- Can be one scene or many scenes
- Typically contains the following game objects:
- Main Camera
- Shared Camera instance, which is utilized for each player’s perspective.
- Although there is just one camera, each new client (player) that joins the room, gets their own camera instance, based off this camera)
- Level Environment (I.E. Arena in the below screenshot)
- Directional Light
- Master Canvas
- Canvas that is unique to the room specifically, and much like the camera mentioned above, shows unique details related to the room, and the client specifically.
- Each client has their own unique instance of this
- Canvas that is unique to the room specifically, and much like the camera mentioned above, shows unique details related to the room, and the client specifically.
- Event System
- Player Spawner
- Spawns our prefabbed player
- Spawns usually at the start of the room loaded
- Room Client
- Room Server
- Terminal
- (not needed but nice to have)
- Connection to Master
- This connects us to the MST Server
- Main Camera
Important:
Please be sure to review the to ensure your understanding of building scenes, and the NEED to be sure you switch platforms, for each and every build!
Deployment for Server:
- Build the Server Build containing Master Server Toolkit and Spawner
- Build the Room Build containing all of your Room Scenes, with the first Room Scene (I.E. First Game Level) set as active
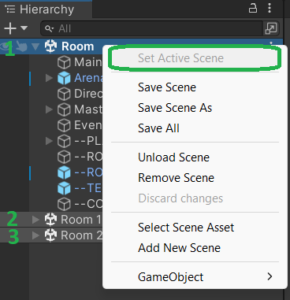
- In our Scenario above, we would open the room scene for game level one, then add a room scene for game level 2 and also add a room scene for game level 3, where game level 1 remains active
- In our Scenario above, we would open the room scene for game level one, then add a room scene for game level 2 and also add a room scene for game level 3, where game level 1 remains active
- Now Transfer the 2 Builds (Server Build and Room Build) to the appropriate directory on your server.
- Keep in mind, your server only knows where the room exe file is via the Spawner Game Object in your Server Build so be sure it matches the server your deploying too’s directory as indicated here:
- *Advanced tip, you can modify the room exe location using the application.cfg file for the room builds, assuming you have created the option for this.
- To learn how to develop this option, review the script named “BasicRoomsAndLobbiesBuild.cs
- Keep in mind, your server only knows where the room exe file is via the Spawner Game Object in your Server Build so be sure it matches the server your deploying too’s directory as indicated here:
Deployment for Client:
- Build the Client Build containing your Client Scene AND all of your Room Scenes, with the first Client Scene set as active
- In our Scenario above, we would open the client scene first, and then add a room scene for game level 1, add a room scene for game level 2, and also add a room scene for game level 3, where the client scene remains active

